服務端開發--Spring
1 Spring
1 概述
Spring是Java生態圈的主流編程框架
它提供了一组强大的特性和工具,包括依赖注入、AOP、声明式事务管理、MVC框架等,使得开发者可以更加高效、简便地构建出高质量的Java应用程序。Spring框架也提供了很多有用的插件和扩展,比如Spring Boot、Spring Cloud、Spring Security等,以满足不同的应用场景和需求。Spring框架的开发者团队以及庞大的社区也为开发者提供了广泛的文档和教程资源,帮助他们更好地使用和学习Spring框架。
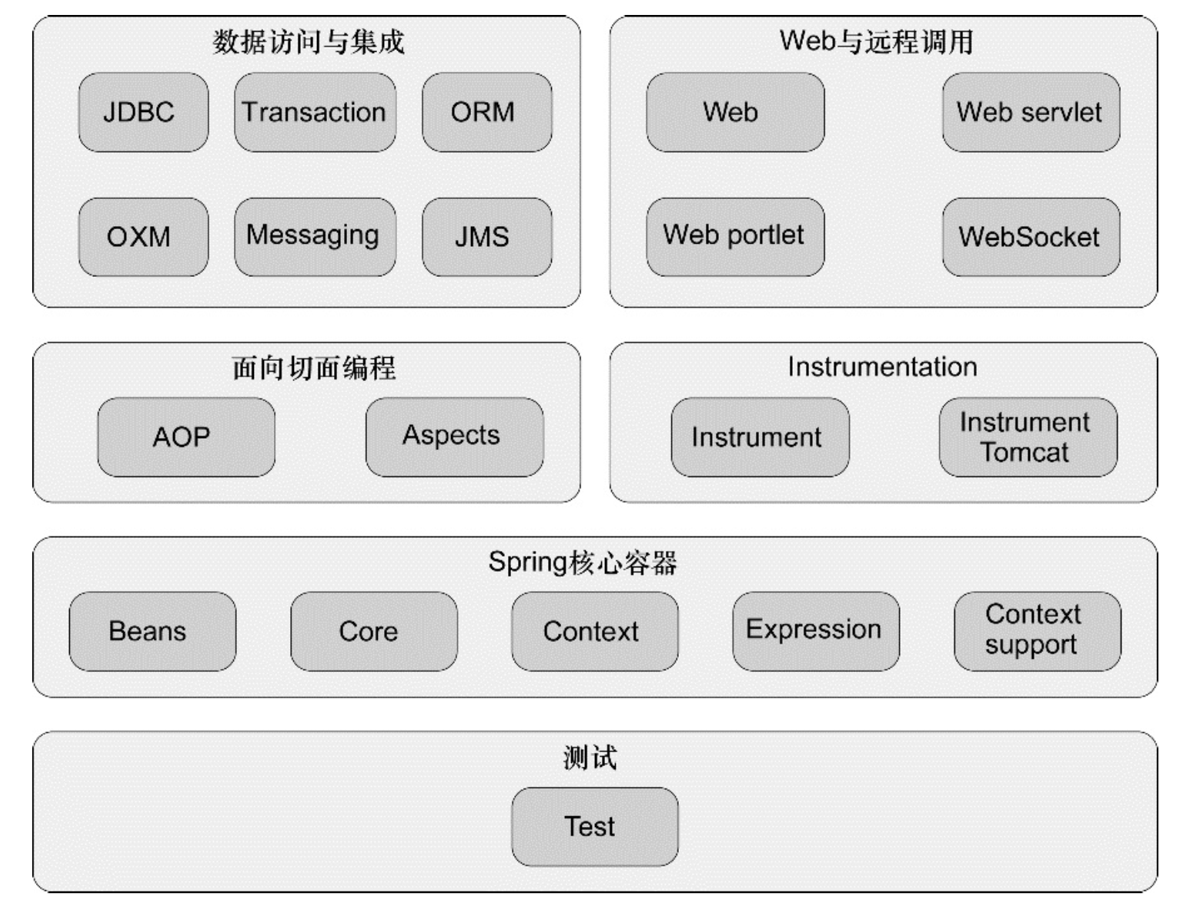
2 模块組成

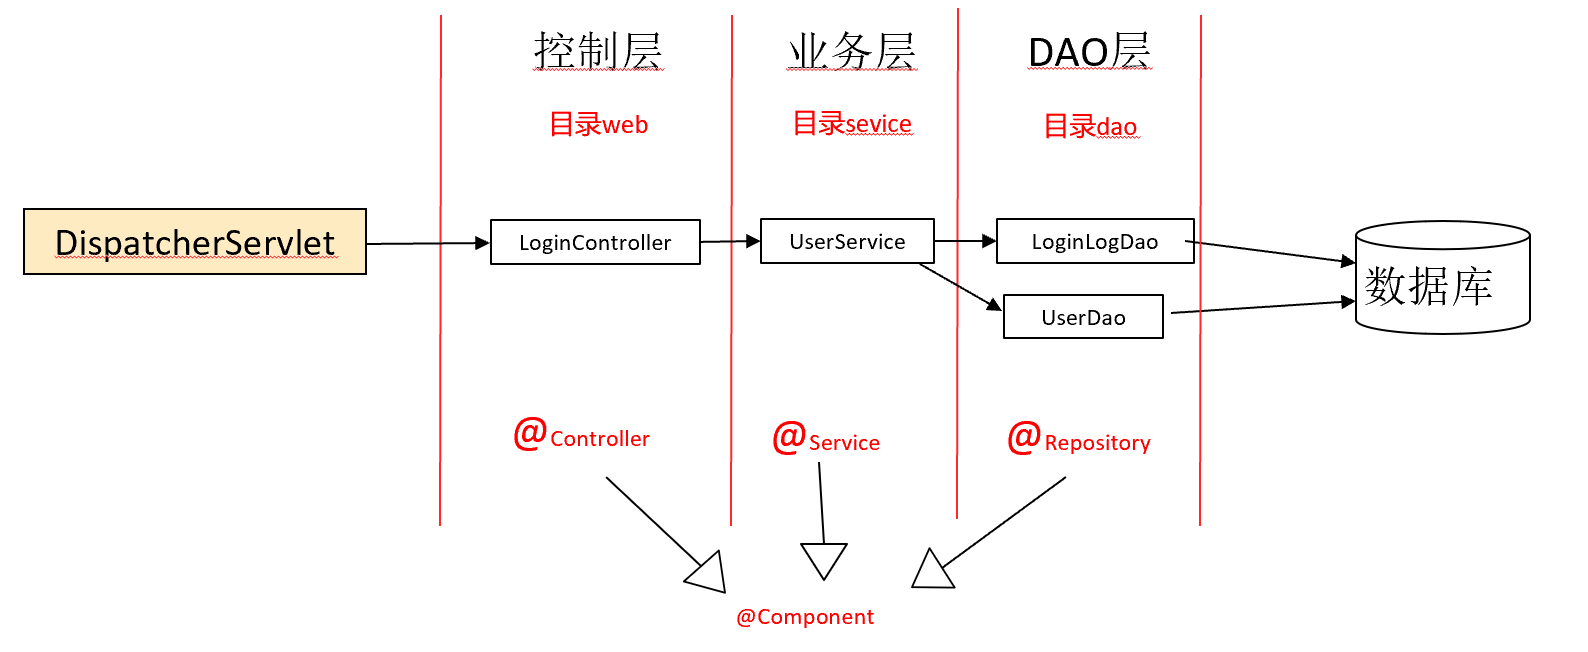
- 经典的基于Spring的典型Web分层架构示例

3 Spring Boot
Spring Boot是一个基于Spring框架的开源框架,通过自动配置和约定优于配置的方式,简化了Spring应用程序的开发,还提供了一组强大的工具和插件,如Spring Boot Actuator和Spring Boot DevTools等,帮助开发者更好地管理和调试应用程序。
Spring Boot的特征有:
- 可以创建独立的Spring应用程序,并且基于其Maven或Gradle括件,可以创建可执行的JARs和WARs
- 内嵌Tomcat或Jetty等Servlet容器
- 提供自动配置的“starter”项目对象模型(POMS)以简化Maven配置
- 尽可能自动配置Spring容器
- 提供准备好的特性,如指标、健康检查和外部化配舌
- 绝对没有代码生成,不需要XML配置
2 依赖注入
如何告訴Spring应該創建哪些Bean,如何建立它們的依赖關係呢?
用依赖注入讓Spring幫我們把程序組裝起來。Bean在Spring框架中,"bean"是一个Java对象,由Spring IoC容器实例化、组装和管理。在Spring中,开发者可以将应用程序中的任何对象都视为"bean",并交由Spring容器进行管理。可以使用XML文件、Java配置类等方式来定义一个"bean",这些定义会告诉Spring容器如何实例化和初始化一个对象,以及如何解决这个对象依赖的其他"bean"。
方法有三種:
- 自動化配置
- JavaConfig
- XML配置
1 自動化配置
寫代碼時加一些注釋告訴Spring
- @ComponentScan
用于自动扫描并装配Spring应用程序上下文中的组件,可以指定要扫描的基础包,从而让Spring自动扫描这个包及其子包中的所有组件,并将其实例化并加入到应用程序上下文中。例如@ComponentScan("com.example")、@ComponentScan({"com.example.package1", "com.example.package2"})
加了这個注解,Spring就會在當前類對应的包以及其子包中搜索@Component对应的類,幫助創建實例对象。1
2
3
4
5
6
7
8
9
10
11
12
public class CDPlayer implements MediaPlayer {
private CompactDisc cd;
public CDPlayer(CompactDisc cd) {
this.cd = cd;
}
public void play() {
cd.play();
}
- @Autowired
用于自动注入依赖对象,可以放在构造函数、setter上,等价于@Inject
构造对象的时候调用构造函数或者setter
required参数:默认为true,可以修改为false表示允许该值为null
使用 @Autowired 注解时,Spring框架会根据注解所在的类的类型和属性名,自动查找合适的依赖对象,并将其注入到该类的属性中。
2 JavaConfig
- @Configuration
用于指示一个类是 Spring 配置类,也就是说这个类中定义了 Spring 应用上下文所需要的 Bean。
这些类中定义了 Spring 应用所需要的 Bean 的创建和配置规则。使用 @Configuration 注解的类会被 Spring 容器扫描并解析,从而生成一个 BeanDefinition 对象。在应用启动时,Spring 容器会根据这个对象来创建并管理对应的 Bean 实例。在这个示例中,AppConfig 类使用 @Configuration 注解指示这是一个配置类,同时使用 @Bean 注解定义了两个 Bean:userService 和 orderService。orderService 依赖于 userService,因此在创建 orderService 实例时,会先创建 userService 实例并将其注入到 orderService 中。这样,在整个应用运行期间,userService 和 orderService 都会被 Spring 容器管理和维护。1
2
3
4
5
6
7
8
9
10
11
12
13
public class AppConfig {
public UserService userService() {
return new UserServiceImpl();
}
public OrderService orderService() {
return new OrderServiceImpl(userService());
}
}
3 XML配置
通過XML文件告訴Spring,不常用
- bean:
- 不能进行类型检查
- 有构造函数参数(构造器注入)
- 元素:每个参数一条
- 引用:
- 值:
1
2
3
4
5
6
7
8
9
10
11<bean>
<property name=".." ref=".."/>
</bean>
<property name="..">
<list>
<value>
</list>
</property>
<util:list id="...">
<value>xxx</value>
</util:list>这三種方法可以組合起來用,用@import导入
4 測試
- 需要在pom.xml中加入junit的依赖
1
2
3
4
5
6
<dependency>
<groupId>junit</groupId>
<artifactId>junit</artifactId>
<version>4.11</version>
<scope>test</scope>
</dependency> - @Test是一个JUnit测试框架中的注释。JUnit是Java编程语言中广泛使用的单元测试框架之一。
@ContextConfiguration是一个测试注解,它用于指定要加载的Spring应用程序上下文的配置信息。在使用@ContextConfiguration注释时,您可以指定一个或多个配置文件的位置。通过指定这些配置文件,JUnit将能够加载Spring应用程序上下文并为您的测试方法提供所需的依赖项。在上面的示例中,@RunWith注释指定要使用的JUnit测试运行器(在此示例中使用SpringJUnit4ClassRunner),而@ContextConfiguration注释指定要加载的Spring应用程序上下文。1
2
3
4
5
6
7
8
9
10
11
12
13
14
15
16
17
18
19
20
21
22
23
24
25
26
27@RunWith(SpringJUnit4ClassRunner.class)
@ContextConfiguration(classes = CDPlayerConfig.class)
public class CDPlayerTest {
@Rule
public final StandardOutputStreamLog log = new StandardOutputStreamLog();
@Autowired
private MediaPlayer player;
@Autowired
private CompactDisc cd;
@Test
public void cdShouldNotBeNull() {
assertNotNull(cd);
}
@Test
public void play() {
player.play();
assertEquals(
"Playing Sgt. Pepper's Lonely Hearts Club Band by The Beatles" + System.getProperty("line.separator"),
log.getLog());
}
}
5 其他注解
- @Profile
用于定义特定bean应该在哪些环境中激活。接受一个或多个字符串参数,每个参数表示一个环境配置。在上面的示例中,@Profile(“dev”)表示DevService只应该在”dev”环境中激活,因此只有当应用程序的激活配置文件中包含”dev”时,该服务才会被实例化。1
2
3
4
5
public class DevService implements MyService {
// ...
}
激活:
- spring.profiles.default
- spring.profiles.active
- @ActiveProfiles(“dev”)
- @Conditional
用于在运行时根据条件自动配置Bean。该类实现了org.springframework.context.annotation.Condition接口,该接口具有一个matches()方法,该方法返回一个布尔值,该值表示是否应根据特定条件创建Bean。1
2
3
4
5
6
7
8
9
10
11
12
13
14
public MagicBean magicBean(){
return new MagicBean();
}
------------------------接口--------------------------------------
publuc class MagicExistsCondition impplements Condition {
public boolean matches(ConditionContext context, AnnotatedTypeMetadata metadata){
Envitonment env = context.getEnvironment();
return env.containsProperty("magic");
}
} @primary
用于在存在多个同类型的 Bean 时,指定默认使用的 Bean。1
2
3
4
5
6
7
8
9
10
11
12
13
14
15
16
17
18
19
20
21
22
23
24public interface Animal {
void speak();
}
public class Dog implements Animal {
public void speak() {
System.out.println("汪汪汪");
}
}
public class Cat implements Animal {
public void speak() {
System.out.println("喵喵喵");
}
}
private Animal animal;
animal.speak(); // 输出:喵喵喵在上面的例子中,存在两个实现了 Animal 接口的 Bean:Dog 和 Cat,其中 Cat 上使用了 @Primary 注解。当需要注入 Animal 类型的 Bean 时,会选择使用 Cat Bean。
@Qualififer
是一种用于注入依赖项的注释。当一个接口有多个实现时,我们可以使用@Qualifier注释来明确指定要使用的实现。
@Qualifier注释可以与@Autowire或@Inject注释一起使用。当容器尝试注入一个接口类型的bean时,它会检查这个接口是否有多个实现。如果有多个实现,容器就会使用@Qualifier注释中指定的实现来注入。
例如,我们有一个接口Animal和两个实现类Cat和Dog:1
2
3
4
5
6
7
8
9
10
11
12
13
14
15
16
17public interface Animal {
void makeSound();
}
public class Cat implements Animal {
public void makeSound() {
System.out.println("Meow!");
}
}
public class Dog implements Animal {
public void makeSound() {
System.out.println("Woof!");
}
}
如果我们想要注入一个Animal类型的bean,但我们需要使用Cat实现,我们可以这样做:1
2
3
4
5
6
7
8
9
10
11
12
13
public class AnimalService {
private final Animal animal;
public AnimalService( Animal animal) {
this.animal = animal;
}
public void makeSound() {
animal.makeSound();
}
}


